Quick overview of ramen. Real ramen is four parts: broth, base, noodles, and toppings.
Broths: Usually chicken, pork, fish, and beef. I've most commonly seen mixes between pork and chicken because the combination creates a creamy and slightly sweet (due to the chicken) broth.
Base: The main flavouring agent, usually miso or shoyu (soy).
Noodles: Self-explanatory, but many judge the noodles just as harshly as the broth and base. Noodles may change based on the type of ramen and the soup's viscosity. For example, I've usually seen thicker noodles used for tsukemen (dipping noodles).
Toppings: Usually slices of meat from the broth, but can include ginger, garlic, welsh onion shavings, naruto (fish cake), menma (bamboo shoots), and seaweed. The meat slices are generally from a tender cut of meat, either the belly or cheek. I believe the trend now is to further prepare the slices, by either grilling or braising the meat.
I had a bag of neck bones from back home (approx. $2), and I began soaking them the night before to remove impurities and blood. This process makes for less work during the boiling stage, which is when the impurities and blood tend to surface and must be taken out by skimming.
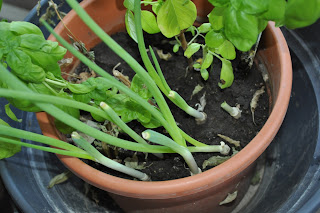
| I parboiled the bones the next day to try getting out more of the blood and impurities. Parboiling is when you boil for about 10 minutes and discard the resulting liquid. After parboiling, I left it to simmer for as long as I could, which ended up being around 10 hours. I also added a pork belly to be used as a topping at about 5 hours in. Here's a picture from the beginning of boiling: And after 5 hours, I added onions and the pork belly (you can't see it though). I just thought that instead of using chicken (which I didn't have), I would instead add some onions to give it sweetness. I also forgot to mention that I kept adding water every 2 hours to make sure the bones were constantly submerged. At the end of 10 hours, I let the broth reduce to create this creamy soup: After the broth was done, I took the pork belly out and put it in a mixture of soy sauce, water, sherry, brown sugar, garlic, and ginger to let it simmer and absorb flavour. The taste was very similar to teriyaki, and I think I could have left out the brown sugar entirely and just used the sherry for sweetness. Unfortunately, I was in a rush at this point and wasn't able to take any picture of the pork belly or finished bowl; sorry! For the final bowl, I used a combination of sesame oil, korean chili paste, the sauce from the pork belly mixture, garlic, ginger, and some fresh green onions from my potted plant: Growing green onions is actually a lot easier than you think. If you've ever gone to the supermarket to buy green onions, make sure to not discard the bulb at the bottom! All you have to do is put the bulbs in some soil, place the pot in sunlight, and water it everyday. The ones above were planted about two weeks ago and have been growing well ever since. Beside them is my basil plant. If you have any questions about japanese food, or would like to request a japanese dish to be made and documented on this blog, feel free to email us at opirgfood@gmail.com. For the next post, I'll be giving you a sneak peek into the Chef & Wife in Dundas. Thanks! Andrew. |


No comments:
Post a Comment